I've been asked by a few people if I could show the soapmaking process I use to make my handmade soaps. This is not a lesson on how to make soap, but just a peek into the different steps it takes to come to the final soap bar that I sell.
1. The first thing I do is set up everything I need to make the particular soap recipe I'm using. Yes, I do use recipes, why? well, because my poor old memory just isn't as good as it used to be ;o) Some soap makers use the exact same recipe for each and every soap batch they make, only changing the colour and fragrance used. I know this would be sooo much easier, but I'm not inclined to take the easy way but what I think is the best way.
I have a different recipe for each of my soaps because I like to offer you a variety to choose from, some people like soaps that are creamy while others like lots of bubbles, that sort of thing. As you can see there is quite a bit to get together, the equipment and all the ingredients, but it makes it so much easier to have everything on hand when I need it.
2. I then measure all the ingredients needed by weight, it all has to be exact, there is no adding a bit here and a bit there with soap making if you want consistent results every time. Here you can see all the different butters and coconut oil used.
3. The liquid component is then measured by mls. depending on what fluid I'm using for the soap recipe. The one I'm making today is "Touch of Heaven", so I have used water in this instance to make the lye that is needed to make soap. I also use fresh Goat's Milk or Coconut Cream to make milk soap as well as Green Tea or organic Carrot Juice in some of my other soap recipes. The liquid is used to make a lye solution and I make it first as it takes the longest to cool down. Yes, lye is a necessary part of soap making. No lye, no soap!
4.  All the oils and butters are now melted. The next part is the bit I find the most time consuming, the soap oils and the lye have to reach the same temperature which is done using 2 thermometers, one in the saucepan with the oils and butters and the other in the lye solution. Sometimes this takes a bit of jiggling to get them both the same temperature at the same time and one or both containers might need to go into either a cold or hot bath to try and get them to the same temperature. Oh, what fun!
5. While I'm waiting for this I line my wooden soap moulds with baking paper and get the essential oils and any extra additives ready to add a bit later.
 6. Here I'm pouring the lye into the soap oils which are now both the same temperature and is ready to be mixed together. I use a stick blender to do this because it is so much easier and faster. At first the mixture is quite thin but as you blend it starts to thicken and turns into a lighter creamy mixture, I keep blending until it is thick enough to hold what is known as trace. This is when you are able to take the stick blender out of the soap and drizzle a small amount over the top of the mixture and it leaves a slight trail on the surface.
 7. We are now ready to add any extras to our soap mix; this is the best time to add any ingredients such as dried herbs or oatmeal as they can be evenly dispersed through the mix without sinking to the bottom. I'm adding essential oils of rose geranium, spearmint, lavender and may chang and finely ground oatmeal here.
8. Once the essentials oils and oatmeal has been mixed through I take some of the traced soap out and mix it with some natural argyle clay to make this pink colour which will be added in with the white soap to make a swirl.
9. I've now added half of this pink mixture into the main part of the soap in the saucepan without mixing through and it is then poured into the soap mould.
10. Once I have all of the soap mix into the soap mould I pour over that other half of the pink mix I had kept aside just to add a bit more decoration on the top so that each soap bar looks pretty.
 11. Now all we need to complete our soapmaking for the day is heat. Soap needs some heat for the saponification reaction to occur naturally and turn our box of soap oils into some beautiful All Natural Soap. To do this I first cover my soap mould with a piece of timber and then over the top of this I place a folded towel.
While our soap is hibernating, it will be going through a gel phase, this is where it gets quite hot and develops a sort of jelly like look, this is a good thing and ensures the soap cures as quickly as possible.
 12. The soap is then left overnight to do its thing and cool down again and sometime the next day it is taken out of its soap mould to see how it has turned out. I can't wait to get up in the morning and take a peep at what has happened. You can see here that our soap has lightened in colour.
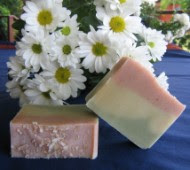
13. The next step is to cut our soap slab above into 3 separate logs and then into each individual soap bar. I love this part as it's always a surprise as to how the soap is going to look once cut and each batch is different.
The soap bars are then stored standing up as you see them below and separated to allow air flow between them for at least four weeks to allow them to cure. Curing time is needed for soap to get rid of any excess water and to turn into mild, longer lasting handmade soap. During this time the soap goes through its final changes, turning into its final colour and making smoother, harder bars of soap. Ahh, there's nothing like the feel of a beautiful handmade soap!
.jpg)
.jpg) I just wanted to remind everyone there's less than one week to go before we give away some free organic soaps. So if you had intended to have a go, now's the time to do it before it's too late.
I just wanted to remind everyone there's less than one week to go before we give away some free organic soaps. So if you had intended to have a go, now's the time to do it before it's too late..jpg)
.jpg)


.jpg)
.jpg)

.jpg)
.jpg)
.jpg)